
How Does Track Lighting Work?

Track Lighting for home/1-circuit
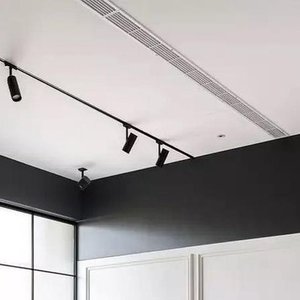
Track lighting for home, also known as 1-phase lighting.
View 1-phase lightingTrack lighting for the office / 3-phase
Track lighting for the office, also known as 3-phase lighting.
View 3-phase lightingTrack lighting for home / Magnetic
Track lighting with magnetic mounting for home.
View magnetic lightingOne of our best-selling product types is definitely track lighting. Track lighting is a versatile and, above all, practical form of lighting that is suitable for many different types of stores or spaces. While track lighting used to be mainly used in supermarkets and clothing stores, it is now also appearing in various interior styles.
What is Track Lighting?
Track lighting is, as the name suggests, lighting that hangs from a rail. There are different types of track lighting, but the most commonly used is the track spot. Track lighting can be rotated 360 degrees, allowing you to easily direct the light exactly where you want it. You can also easily change the position of the lights along the rail. So, if the interior of your store is being renovated, track lighting makes it very easy to adjust your lighting plan to fit the new layout. This makes track lighting incredibly suitable for the retail sector. Additionally, you only need one cable per rail, so you don't have to install a new cable for each light; instead, you can easily connect your entire lighting plan with just a few cables.
How to Install Track Lighting?
Track lighting is relatively easy to install. Here’s a step-by-step guide on how to best approach the installation!
- Choose the location and turn off the power. When you want to install a track system, one side of the rail needs to be connected to a power point to supply the rail with electricity. Always turn off the power when working with lighting, and use a voltage tester to make sure the power is actually off.
- Determine the shape of the track system. Thanks to the many accessories, you can easily create a whole network of tracks. Always measure your ceiling beforehand and plan how your lighting setup will look.
- Attach the rails. The rails are provided with holes. You simply need to drill holes in the ceiling with a drill and screw the rails in place.
- Connect the wires. Start by stripping the wires. You’ll need a terminal block, which typically has two or three openings. Two of the openings are for the black and blue wires. The center opening is usually for the ground wire (the yellow-green wire). If your lamp is grounded, connect this wire to the terminal block as well. Use a small flathead screwdriver to open the terminal block openings, insert the wires, and tighten them back up.
- Attach the track spots to the rails. Since the entire rail is powered, you can place and move the track spots wherever you want. Always turn off the power before moving the spots. Typically, you can click the track spots into the rail with a simple click system. Now your track system is installed!
Types of Track Lighting
At Qub, we sell various types of track lighting. In addition to the classic round track spots, you can also choose square track spots or wallwashers. You can even connect pendant lights to the track using special pendant adapters. We also offer both black and white track lighting. Browse through Qub’s wide range or get advice from one of our Qub lighting experts!
The Difference Between 1-Phase and 3-Phase Track Lighting
Additionally, you can choose between 1-phase and 3-phase track lighting. With 1-phase track lighting, all lights are connected to the same group. This allows you to turn all lights on or off at once or dim them simultaneously.
With 3-phase track lighting, you can create 3 different lighting groups per track. This is often done to prevent the electrical system from becoming overloaded, but the added benefit is that the 3 groups can be controlled separately. You can connect each of the 3 groups to separate dimmers or switches. This way, with 3-phase track lighting, you can choose at any time how much light you want in a room or which objects you want to highlight.
